MATERIALS
• Peterboro Conservation Matboard as ground
• Derwent Pastel Pencils- to draw up the subject, and my signature (I often use Conté crayon for this )
• Rembrandt Pastels-my favourite pastel and used for most of this work.
• Schminke pastels- for the sky and some dust and highlights
• Conté Crayon- for the military bit (it just happened to be the right colour and no pastel had been applied there)
• Lots of tissues (mostly to wipe my hands and clean the pastels, but can also be used to remove excess pastel)
• Soft Brush- small and flat to lift off excess pastel to make a correction in detailed areas
• Kneadable rubber- only rarely used to lift unwanted pastel when making a correction
• Pastel colours:Cobalt Blues – Burnt Umbers – Burnt Siennas – Raw Umbers – Gold Ochres -Yellow Ochre – Lemon Yellow – Pink – Dark Mid and Pale Grey – Black – White
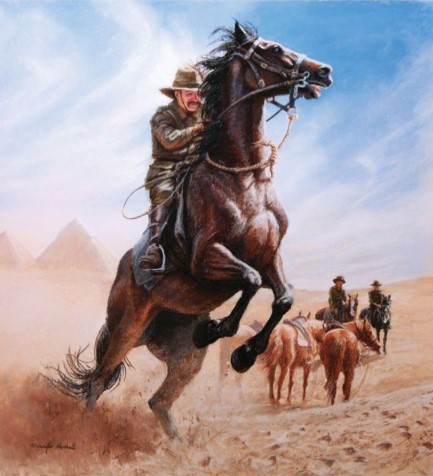
The subject for this demonstration was inspired by a true story,told by a local gentleman about his grandfather who had the task of training the remounts as they arrived in Egypt during World War I. Riding a quiet horse he would lead three others into the soft sands of the desert, then one by one he would ride them. The soft sand made the going much harder for the horse to misbehave, and if either of them fell it would be a soft landing.
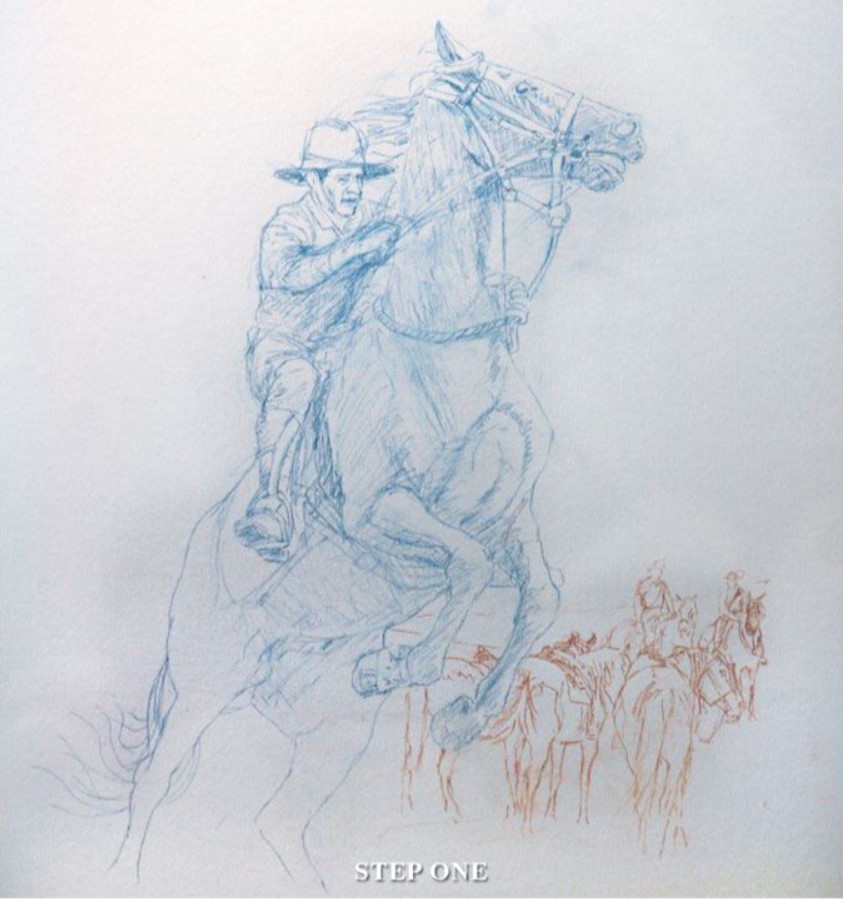
STEP ONE
I chose a warm sandy coloured sheet of conservation matboard and draw up the main horse and rider with a Prussian blue pastel pencil, and the rest with a Terracotta pastel pencil.
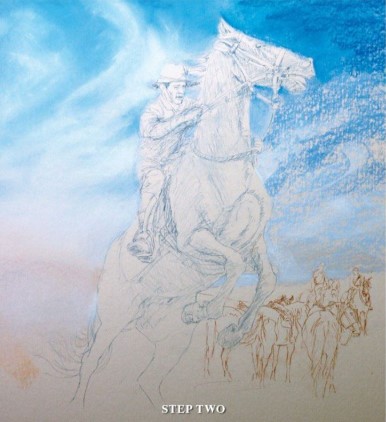
STEP TWO
Using the side of a broken pastel I roughly laid in the sky with four differing intensities of Cobalt Blue and a cool white and some Gold Ochre and Raw Sienna towards the horizon and some light Burnt Sienna and Burnt Umber below the horizon. I then used my fingers to blend these colours on the left side. Notice I have encroached somewhat onto the drawing of the main figures.
STEP THREE
I have continued blending the sky on the right side with my finger – adding a bit more pastel when necessary. Roughly laying down a pale Burnt Sienna Gold Ochre the over the rest of the ground, I darkened this and added some Burnt Umber to indicate where the shadows will be.
I then started on the 3 middle ground horses. I first blocked in the shadow areas of the horse on the left with Burnt Umber and I added a blue- violet to the darkest areas.
Then I added the highlights with the palest Cobalt blue and Gold Ochre, and blended these two areas with a light Gold Ochre or Raw Sienna. The overall effect is to be light and dusty.
The second and middle horse, a light chestnut, I proceeded in the same manner, roughly blocking in the darkest shadow areas (saddle, girth and a legs and jaw) with Burnt Umber. I went over these areas (except the saddle) with Gold Ochre and a touch of Burnt Sienna, which has not been blended in, but will unite this horse to the next one. The highlights on this horse were laid down with a very pale Burnt Sienna and Gold Ochre and then highlighted again with warm white. The lightest areas of the saddle I touched with a pale Cobalt blue and the saddle blanket and stirrup with a warm white.
The third horse, a brighter and darker chestnut, I proceeded by laying down Burnt Sienna in all the shadow areas, touches of pure Burnt Umber was used in the darkest areas- saddle bridle eye, nostril, mouth inside hind leg side of belly and shadow of mane. A lighter tone of Burnt Sienna was used to create a bit of form in the shadows. The highlights on this horse were done with a very light Burnt Sienna and Gold Ochre, and then a touch of warm white on rump and blaze.
I then began the left hand background horse, blocking the shadowed areas with mars violet, and the saddle and blanket with grey. This horse has a big white blaze and a white muzzle although most of it is in shadow. A couple of tiny spots of white indicate where the light hit just above the noseband and the side of his muzzle. The rest of the blaze was placed with a pale Cobalt blue and a touch of pink on the muzzle.

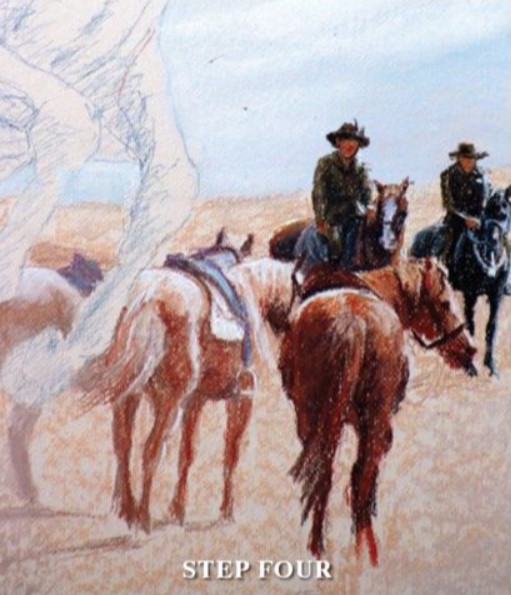
STEP FOUR
I blocked in the shadows on the right hand background horse with a very dark grey. The riders I used mid tone Burnt Sienna for their faces and hands,no detail, and blocked in their khaki uniform with a dark Raw Umber. I added a bit of dark Burnt Umber and the dark grey in the darkest areas, and a dark (3) yellow Ochre on the lighter areas to give some shape, I also used a lighter Burnt Sienna on the face and hands, then a touch of warm white on the high lights on the riders shoulder, arm and hands. I refined both horses, added darkest darks with both Burnt Umber and dark grey, then on the chestnut I used lighter Burnt Siennas and a touch of Gold Ochre in his sunlit areas, and a warm white on the highlights on rump and shoulder. The saddle blankets and saddles were laid with a grey Burnt Umber and a light Cobalt blue. The black horse’s highlights were placed with the same light Cobalt blue and a tiny touch of warm white. I am not really happy with the rider on the right – he seems somewhat hunched – probably because his head and hat is too low- I will leave him for now and deal with him later. I can’t wait to get to the main subject.
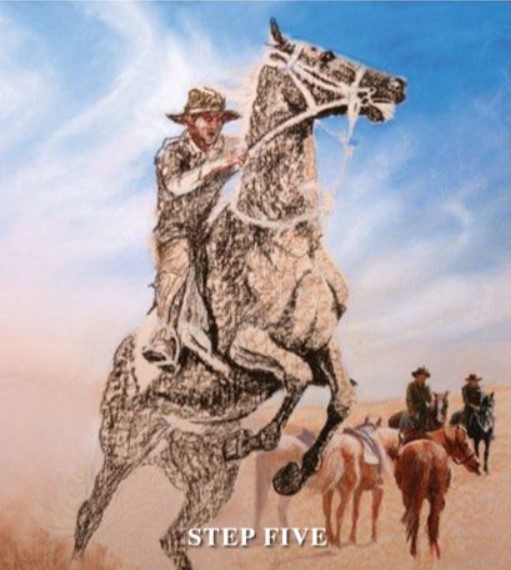
STEP FIVE
I block in with the side of a dark Burnt Umber pastel, all the dark areas of the main subject very roughly. Then with a light Burnt Umber I block in the sunlit areas of the horse, and Burnt Sienna on the rider’s face and hands, and I switch to Raw Umber on the hat. I then begin go back to the dark Burnt Umber and use more definite stokes to lay in the darkest darks, and a little detail – the eye, under the horses jaw, and forelegs.
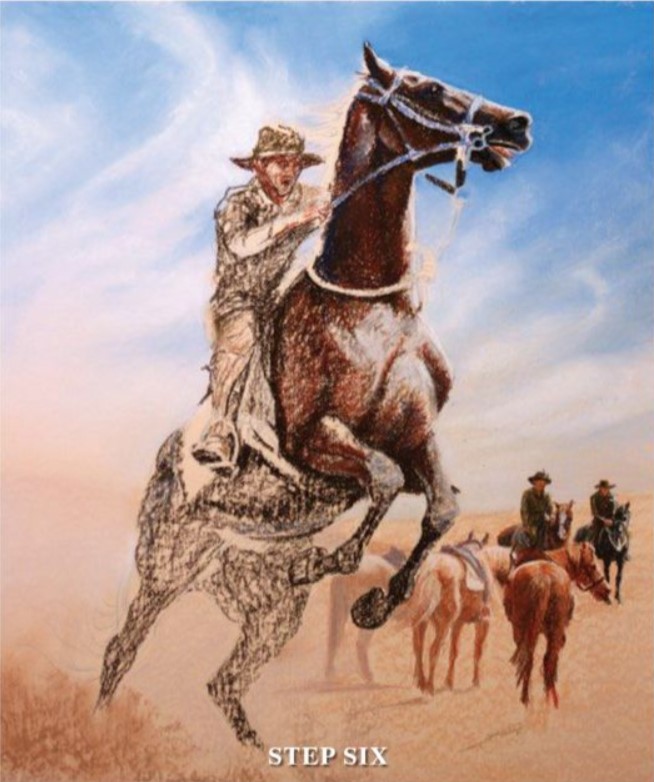
STEP SIX
I now introduce a very pale Cobalt blue onto the areas of the horse in the sunlight, and a darker Cobalt blue and Burnt Umber in the darkest areas using Burnt Sienna in the mid-tones of the shadows. I keep building up the layers of pastel using these colours, and gradually bringing out the structure of the horse as revealed by the light and shadows. I rough in the bridle with Cobalt blue, and use a pink and Umber for the horse’s tongue. The bit I have roughed in with a pale blue Conté. I used a warm white on the highlights of the head, neck and breast of the horse.
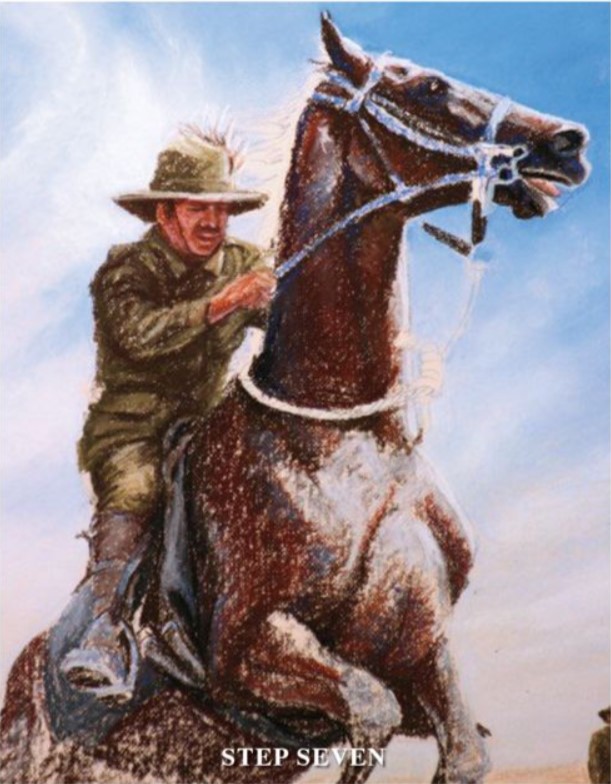
STEP SEVEN
Now I start on the saddlecloth saddle stirrups, girth and leggings of the light horseman. First I block in the darkest areas and then the lighter areas using a dark grey, mid, grey, Cobalt bluepale and Burnt Umber – dark in the shadows, pale on the leggings on top of pale Cobalt blue. I then move up the Light Horseman and using Raw Umber I block in the shadows and use lemon yellow (3) on the lighter parts, also add Burnt Umber to these shadowed areas of the tunic- this ties in with the horse-remember the colour of the horse will be reflected up into the rider. Using Burnt Siennas, Burnt Umber, and Indian Red I work on shaping the face and wrist. I don’t worry about the fingers as the mane will cover these later.
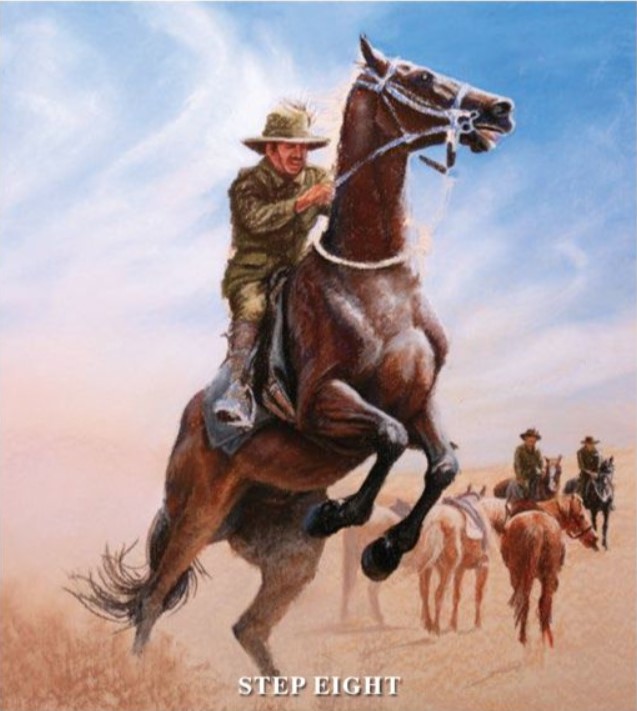
STEP EIGHT
I then start forming the shape of the horse’s body, using Burnt Umbers, Burnt Siennas, Cobalt blues and a dark charcoal grey, keeping in mind the sand and dust that the horse has just kicked up in front of his back legs. I use quick flowing strokes to get the movement in the horse’s tail, and some pure black on the horse’s front legs and blended in to the darkest shadowed areas.
STEP NINE
I refine the horse’s front legs and darken the girth area, and further refine the nuances of light and shadow on the horse’s head, then I turn my attention to the rider and work on the shadows and the lights on the horseman’s uniform – note the reflected light on the rider’s face and the underside of his sleeve. I use Raw Umber, Burnt Umber, a grey yellow and a pale Cobalt blue on the highlights. The saddle blanket is a mixture of greys with Burnt Umber in the shadows.
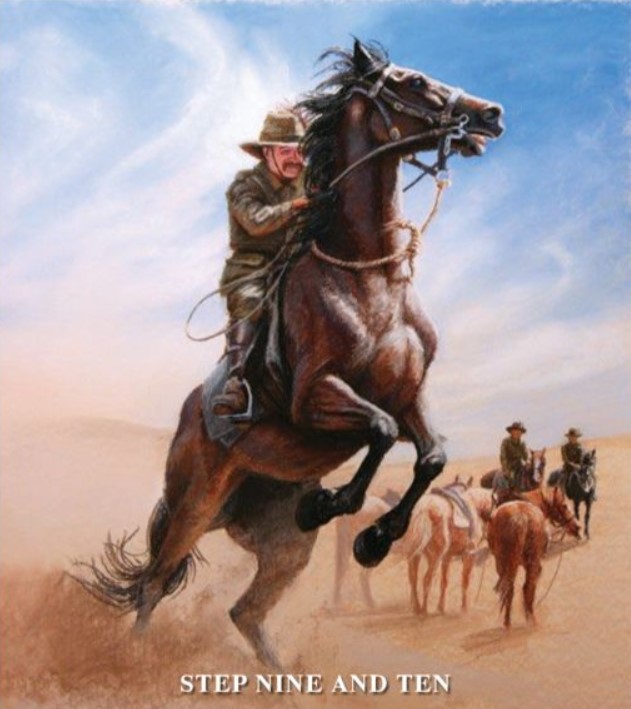
STEP TEN
I receive the photo of the gentleman whose story I am painting, so I modify the rider’s facial features and extend his moustache to more closely resemble William Skinner. Then I use the very dark charcoal black and Cobalt blues with a touch of Raw Umber for the mane. I also refine and complete the horse’s neck, shoulders, bridle, headstall and the rope lead that is tied about his neck. I add the rest of the reins, and pale Cobalt blue on the upper side of the saddle blanket where it will reflect the sky and add a bit of Gold Ochre to the dust in the bottom left corner.
STEP ELEVEN
Next day to my joy I receive the story of William Skinner in an email, and there is one more detail to add – he rode these horses in the soft sand not far from the pyramids in Egypt, and so after a little research on the subject I add the two pyramids in the background peeping above the sand dune on the left. I then raise the horizon line of the sand dune behind the other riders, tweak the sky and add the foreground sand disturbed with hoof prints and add some bits of sand and dust flying from the horses hoofs.

FINAL STEP
I rather like the hoof prints leading up and out of the picture to the right, so I extend the sky and the sand dunes on the right of the painting, darken the rein as it curves round the horse’s neck and under his mane. I tweak the other horses and riders a wee bit, touch up a highlight here and there, then for the first time I take the painting outside and spray with Workable Fixative – three very light coats with drying time between. I then sharpen a soft pastel pencil add my signature. “Re-educating the Remounts” is now complete.