MATERIALS
• A sheet of Art Spectrum
Colourfix pastel paper, Midnight Blue colour cut in half
• Soft Pastels – Studio Palette – I use a variety of brands including Mt Vision; Unison; Art Spectrum; Rembrandt; and Terry Ludwig
I always find that a painting painted outdoors has a freshness and spontaneity that a studio painting lacks.
STEP ONE
Using the recent plein air pastel painting as my reference and with a stick of Vine Charcoal, I drew in the major shapes of my landscape composition on to a half sheet of Art Spectrum Storm Blue Colourfix sanded paper. Design: The main focal area of this painting is the large fan-shaped fig tree, the use of converging lines direct the viewer’s eye to this point.

STEP TWO
I begin to block in the sky using layers of pastel. Pink, Blue and Yellow, gradating the warmer colours towards the direction of the sun on the left side of the painting. There is a Pink tinge to the sky on the horizon, which graduates upwards into the Blue. I am using the side of my pastels and light pressure, not attempting to complete the sky in this step, as I am aware I may wish to change it as I progress through the painting.

STEP THREE
Leaving the Blue paper as my base shadow colour for the distant ranges, I apply the sunlit areas of Green grasses. Intense, Warm Green is used in the foreground, and the paler, less intense Greens are used as the hills recede into the distance. This is to create the illusion of aerial perspective. Again, I am only using light pressure so as not to fill up the paper tooth, to leave room to add other colours to these areas as the painting progresses.

STEP FOUR
I begin to block in the main tree shapes, using darker tones to represent shadowed sides. Here I’m using Dark Purple and Green. The large fanshaped fig tree is my focal tree, and it is a warmer Dark Olive Green.

STEP FIVE
I block in the two far distant range of hills using mid-lighter tones of Blue, then I add a lighter tone to each to represent the sunlight and shadow effect which is quite subtle, as these hills are so far away. I then begin to work in the areas of shadow in the background hills, adding marks of darker Blue for darker shadows and to indicate the texture of trees and bushes. A Blue Green pastel is also used to indicate the grassed areas within the shadows. I keep some of the paper colour showing through in the shadows. This provides unity in my painting.
I begin to paint the light side of the trees in the mid-ground hill on the right, and the foreground hill on the left. I use brighter Greens for the closer trees and a duller greyed off Green for the distant ones. I apply a cooler Blue Green over the shadows on the grass on the foreground hill on the left.

STEP SIX
Time to apply more light, and to add variety to the Greens in the trees. There is a contrast in colour and texture in the light hitting the top of the range of gum trees in the left sided mid-ground deep valley, and for this I use a mixture of greyed off Pinks, Greens and Blues until I am satisfied with the result. I build up lighter tones on the large fig tree using warm lighter Olive Greens.

STEP SEVEN
I add thicker pastel to the grasses in the foreground using uneven marks to indicate texture. I repaint the bushes on the right closer hill as I feel they need more texture and tonal contrast to compete with the visual action on the closer slope on the left. I repeat various Greens throughout the painting to aide unity. I add highlights to the foreground trees. I indicate some of the branches in the large fig tree using a Blue pastel.

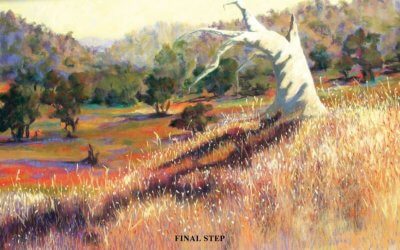
FINAL STEP
Finishing off. Finally I suggest textural vertical foliage in the foreground grasses to soften the edge of the paddock and to add a contrasting warm complementary Brownish Pink colour. This helps to break up the Green and soften the edge of the foreground paddock. I add more pastel to the sky to reduce the amount of paper colour showing through, using a firmer pressure with a cross-hatching application. This eliminates some of the texture in the sky, which helps it to appear to recede. I decide to increase the warmth in the sky by adding more Pink. I add in the paler small leafless coral trees on the right hill for added contrast. I knock back some of the lighter tones hitting the sunlit trees to the left of the fig tree because I think they are demanding too much attention, and I add more highlights on to the lit side of the fig tree. Time to sign off.

ARTIST’S HINTS AND TIPS
• Work from life as much as you can. In landscape painting, this helps the artist to develop skills required to simplify the scene and focus on what is really important in the landscape. Only in life can true value and colour comparisons be made. The experience of working outdoors heightens all of the senses, and the painting experience is energised from this emotional connection.
• Study the colour wheel and learn to identify colour through sight and not rely on “names” of colours. Take a workshop to learn about warm and cool and neutral variations of colour.
• Words of wisdom to share – practice makes perfect. Work hard to grow. Be prepared to make mistakes and admit them. Look for the good things in each painting and correct the things that don’t work. Be mindful of ego, and be humble about your work. The next painting must always be better than the current one. Paint what you love and take the time to enjoy the process. Spend time with fellow artists.