
MATERIALS
• Pastel Paper Mi-Teintes
‘Sky Grey’
• Make up sponges or kneadable eraser
• Electric pencil sharpener
• Charcoal
• Sandpaper
• Art Spectrum pastels:
• Fresh Grey
• Ivory Black
• Green Grey
• Rich Beige
• Sand
• Flinders Red Violet
• Rembrandt Pastels:
• Gold Ochre
• Raw Umber
• Light Oxide Red
• Schmincke pastels:
• Black
• White
• Vandike Brown
• Carbothello Schwan Stabilo pencils: 100, 105, 435, 610, 620, 640, 642, 635, 681, 685, 750
STEP ONE
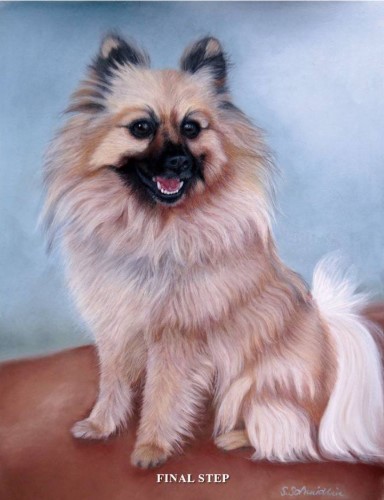
Once I have an animal in mind which I am interested in painting, I ask the owners if I can take some photos. In this case it is a neighbour’s dog, a Pomeranian called Max. I was able to take many shoots. At home I printed them all in colour on photo gloss paper and then decided which one to paint. It was a difficult decision. I very much liked the photo of him when he was sitting on the chair, but I did not like the background and thought it was a shame that his beautiful tail did not come to revelation. So I had the idea to change it slightly.
Before I start a painting, I draw a detailed draft. It helps me to get familiar with the painting, and draws my attention to mistakes which I will try to avoid on the actual painting. It is an effort which is worthwhile.
I will then draw the actual painting with charcoal on the Mi-Teintes pastel paper. I erase unwanted lines with a makeup sponge. I can wash these and use them over and over again. I keep the charcoal very sharp by sharpening it on sandpaper.

STEP TWO
Once I am happy with the drawing, I outline it with Fresh Grey and paint the colour into the fur in an outward motion. Then I add the dark tones from the left side to the right. For the ears I use Green Grey and Ivory Black, and smear the colours with my fingertips together. For the face I am using Rich Beige and Sand on the lighter parts, and Gold Ochre and Raw Umber on the darker parts. I blend in the darker colours before I begin with the lighter shades, and clean the pastels frequently.

STEP THREE
I am always a bit inpatient during the awkward stage of the painting. I can’t wait for the pair of glossy eyes to look at me! That is when my painting becomes alive. I outline the eyes with the Black pastel pencil, then I paint the medium highlights with the Ultramarine Blue Light No. 435 and also use the same colour sparingly for the highlighted parts of the lower eyelid, Then I add some Flesh Tint No. 681.
I use Vandike Brown from Schmincke for the iris, and add lighter shades with Bister Brown No.635 and smear the colours together with my fingertip. Some artists use their thumb and do a 180 degree turn. With Sienna No. 685, I draw little circles within the iris Then I add the White from Schmincke for the lightest part. Under the eyes I use Light Oxide Red, smear it with my fingertip and draw little hairs with Ivory 105 slightly into the Black and Light Oxide Red, in the direction of the fur.

STEP FOUR
For the nose I use Black from Schmincke, and Ivory Black and Green Grey from Art Spectrum. With Ultramarine Blue Light No. 435 I paint the highlighted parts and add some dots on the nose which simulates the pores. I surround the nostrils with some Flinders Red Violet from Art Spectrum. I find it a very good colour for muscous membranes of animals. From no other brand I have been able to find a similar colour.For the lips I use the same colours as I have used for the nose. I try not to exaggerate the highlight of the under lip which is tempting to do. It does not improve the realistic look!
I paint the tongue in Caput Mortuum 642 and Flesh Tint 681 for the lighter parts. After a few layers the rough structure of the tongue happens automatically, just by the rough structure of the paper.
For the teeth I use Ivory 105 and for the highlights I use White 100. Teeth should never be done in bright white. A few white highlights will do the job; it will look more natural.

STEP FIVE
Before I continue any further, I start with the details of the head and chest. I need the empty space under the chin to support my hand. I have only outlined the painting in Fresh Grey as far as I am still able to put my little finger as support on the empty space of the paper. First I concentrate on the head. At this point of the painting I am only working with the pastel pencils. I keep them needle sharp with help of the electric pencil sharpener and add firm, fast and flick strokes in the direction of the fur.
With the Cold Grey No. 726 and Ivory 105, I add the hair the way I see it on the reference photo. I paint them in layers, one layer over the other and avoid making the root visible. I use Ultramarine Blue Light No. 435 and do the same from the outer side of the painting and go right into the fur. The pencils need to be wiped on a frequent basis, otherwise it will leave unsightly dots on the painting.
Under the chest I use Schmincke Vandike Brown and Gold Ochre from Rembrandt. I smudge the colours together (Step Five A), the result is a good colour match of Max’s fur. Then I use Sand from Art Spectrum and place strokes in the direction of the fur (Step Five B) and softly smear them with my fingertips (Step Five C).


STEP SIX
For the next layer of fur, I use some Green Grey from Art Spectrum, Gold Ochre and Raw Umber from Rembrandt and Schmincke Vandike Brown. (Step Six A). Once the colours are smeared together, I use Ivory 105 and place firm strokes in the flow of the fur and emphasize the fluffy fur with Raw Umber 610 and Caput Mortuum Violet 640 (Step Six B).


STEP SEVEN
For the legs, the body and the tail, the technique remains the same as showed in Step Five and Step Six. The tail is the lightest part of the fur. I laid the ground colours with Gold Ochre and Sand, smeared it and placed strokes with Rich Beige.

FINAL STEP
As I said at the beginning of the article, I was not completely happy with the reference photo. I was not very fond of the background and I also thought the tail was not shown in its full potential. I believe it is my artistic freedom to do certain changes as long as I stick precisely to the appearance of the object. In this case I used another reference photo of Max where he was sitting in the same position, only his head was turned away but his tail was shown better.
I kept the background simple as I didn’t want to distract from the actual painting.

ARTIST’S HINTS AND TIPS
• Buy the best material you can afford! There are big differences in quality and you won’t have an excuse anymore to blame it on the lousy material if something goes wrong!
• Buy some incontinence mats.They are the best underlay for pastel dust catching and are easy to dispose of. You can wipe your pastels on the mat without even having to take away your eyes from the painting. You end up with a sparkling clean desk!
• If you are into animal painting, get yourself Art Spectrum Flinders Red and Flinders Violet.
• Paint the fur of the animal as you see it, don’t try to tidy it up!
• Wipe your pastels and pencils frequently
• If you have overworked an area and the paper does not take any more pastel, just use a stiff brush to remove it.