Materials
• Sanded card (26 x 20 inches).
• Reference photographs from my garden. A range of soft and hard pastels in suitable tones.
• Fine sticks of vine charcoal.
• Pastel paper stumps in various sizes.
• Masking tape.
• Baking paper.
STEP ONE
My selection of colours is chosen from autumn flowers in my garden. These are set up on a plate. The colours may change as the work progresses. After taping the card to a padded board, I’m ready to start. The masking tape gives a clean edge to the finished painting and makes framing easier. A quick charcoal sketch places the flowers and helps to keep them clean and fresh.

STEP TWO
For the background, I layer a few tones. When I’m happy with the colours I push them into the card with my fingers, around the sketched flowers. I am careful to keep the light in one corner. The background is very important. I like to get the shading right at this stage.

STEP THREE
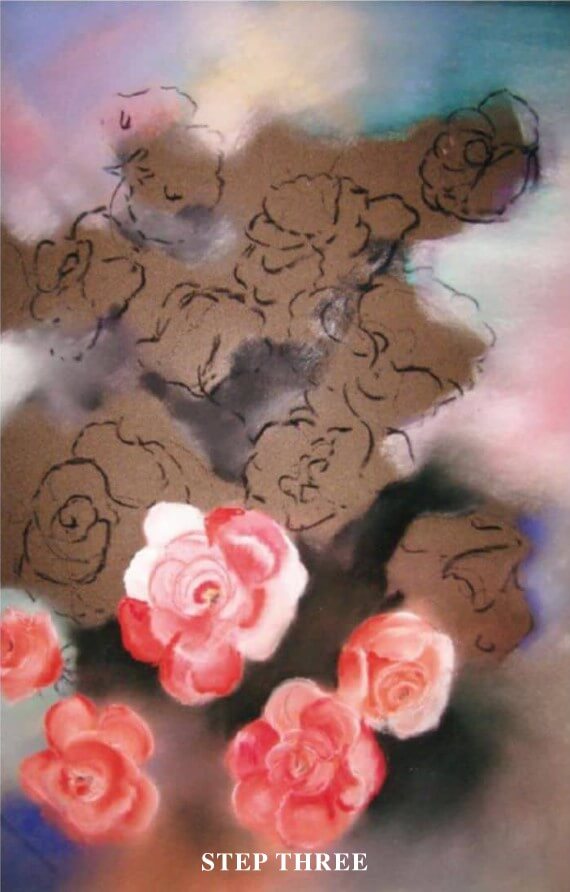
At this point I am ready to start on the flowers. I concentrate on each flower until I am happy with the result; making sure I keep the chosen colours aside for further use. While continuing with the flowers, I add some buds and leaves.
STEP FOUR
To paint the vase, I softly drag colours downwards – adding more colour as needed.Vine charcoal finishes off the twigs and leaf veins.

FINAL STEP
When I have completed the painting, I don’t use fixative. I put sheets of baking paper over the whole surface and gently press the pastel in. Any loose pastel is picked up during this process.