
Materials
• 8”x10” Art Spectrum ColorFix paper – Raw Sienna colour
• Saral Yellow transfer paper
• Premier Prismacolor coloured pencils
• Kneaded eraser
• Wide soft drafting or watercolour hake brush
• White gouache paint
• Round synthetic brush size 1/0
• Workable Mat Fixative
• Permanent Gloss or Satin finish
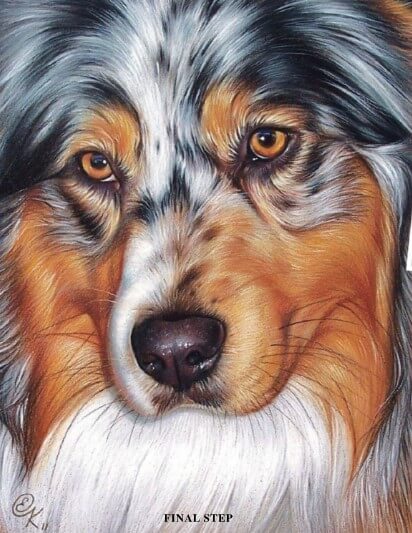
For this demonstration I have chosen to do a close-up portrait of a beautiful Australian Shepherd dog which I photographed some time ago at a dog show. This Blue Merle coloured dog has a unique “painted” coat pattern and intelligent golden eyes, so I needed to decide what colour of the paper would be better to use. I love to use dark or strong colours for my art, which are base colours of the subject. For this portrait I could have used a grey colour which is the base colour for the blue-ish grey fur, but as I wanted the eyes and golden “cheeks” to be a focal point, I decided to use Raw Sienna Art Spectrum ColorFix paper.
STEP ONE
I cropped the photograph, and then drew the dog on plain white paper using a grid (or free hand). All changes and adjustments should be made at this stage, so I don’t have to worry about it later during the colour stage, as erasing could be difficult then ( but not impossible). When I was happy with the composition, I transferred the drawing to 8″x10” Raw Sienna ColorFix paper using yellow artist’s transfer paper (I often use white transfer paper on dark backgrounds, but here I felt yellow would be better).

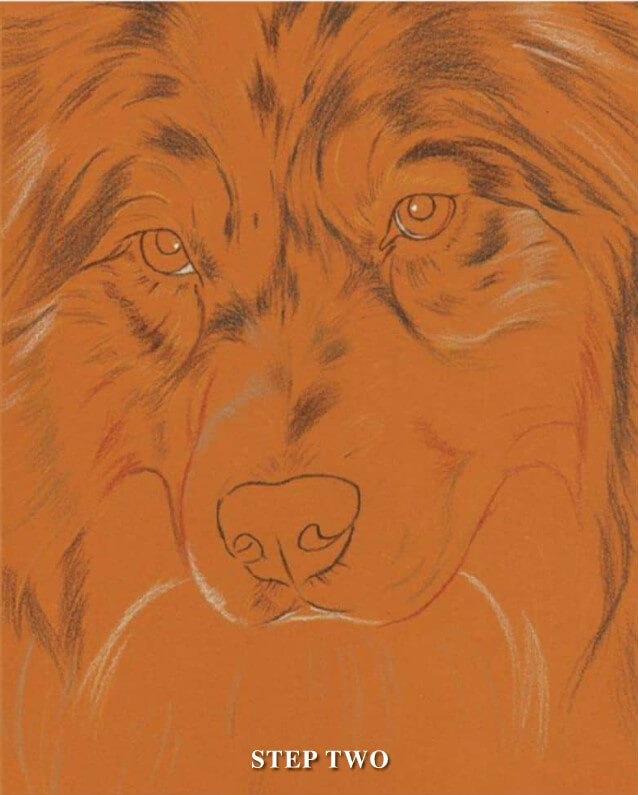
STEP TWO
I tapped lightly over the whole drawing with a kneaded eraser, so the lines were still visible, but not dominant – otherwise they would show through layers of the coloured pencils. Then I went all over it again with coloured pencils creating like a “colour map” for future layouts. I used Black, White, Cloud Blue, Warm Grey 10%, 70%, 90%, Cool Grey 30%, 50%, Terra Cotta, Dark Umber and Light Umber.
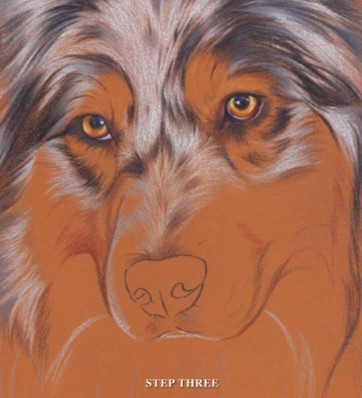
STEP THREE
I started doing the eyes first – just because I like my subject to look “alive” from the beginning and it makes the whole process more enjoyable. Then I began to lay out base colours, starting from the top and using light linear strokes in the direction of hair growth, following the coat’s pattern, leaving the “golden” patches free of colour at this stage. For eyes I used Terra Cotta, Pumpkin Orange, Yellowed Orange, Jasmine, Cream, Black and Imperial Violet. For hair: White, Cloud Blue, Cool Grey 30%, 70%, 90%, Jade Green, Beige, Dark Brown, Terra Cotta and Black.
STEP FOUR
I finished with the base layout on the neck using White, Cloud Blue, Beige, Cool Grey 30%, and Warm Grey 10%. Then I started doing the cheeks and eyebrows using Cream and Beige for the lightest areas, Yellowed Orange a nd Pumpkin Orange for the midtones, and Terra Cotta, Burnt Ochre and Dark Brown for the darkest parts, allowing the colour of the paper to look through. After that I decided to take off some of the pencil with the kneaded eraser to allow even more of the colour of the paper to be visible in the golden patches – for overall warmth and glow. Then I did the nose, using circular strokes and allowing the texture of the paper to help me.I used Black, Dark Umber, Clay Rose, Black Grape and Indigo Blue.

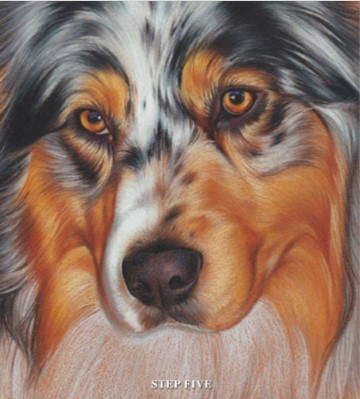
STEP FIVE
Then I started to overlay the colours I used in the base layout from the top to the bottom of the drawing, defining details, adding more pressure and smoothing texture (burnish) where I don’t need it, and always following the direction of hair. The portrait started to look more realistic now.
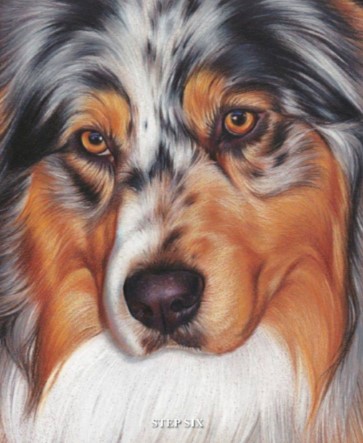
STEP SIX
I finished overlaying the colours on the cheeks, neck and nose. I added more White on the neck fur, defining shade and light areas. I left some of the paper’s texture to be visible on the nose and added highlights with Clay Rose and Lavender Grey. Then I carefully examined the drawing and added more details, individual hairs, contrast and shading where needed. Then I lightly wiped off all the dark and middle tone areas with soft paper tissue to remove “wax bloom”, and brushed the artwork with a wide soft watercolour brush to remove all the waxy dust, so it will not smear and ruin the artwork. I sprayed it with Workable Matt Fixative to prevent “wax bloom” to reappear and also to prepare the surface for the final “gouache” stage as a water-based paint will not adhere to a “waxy” surface.
FINAL STEP
This is the most enjoyable part as the subject comes to life! I used Lucas White Gouache paint and a 1/0 round synthetic brush and put highlights on the eyes, nose and fur. I painted lighter whiskers and drew darker whiskers with sharp Dark Umber and Terra Cotta pencils. Acrylic white paint also could be used for this stage instead of gouache, but I prefer gouache because it could be fixed easily if a mistake is made – I just wet it with the brush and blot it with the tissue. I let the paint to dry, signed.

ARTIST’S HINTS AND TIPS
• When drawing animals always use linear strokes, allowing your hand to move freely in the direction of hair growth even in the base layout, as this helps to achieve realistic results more easily and quickly. Allow your paper to do some of the job for you – use paper colours that compliment your artwork.
• It is not a bad idea to brush your work often with a soft desk brush during the process, as wax coloured dust is sticky and could smear and ruin your work.
• Keep your pencils sharp at all times – it will help to achieve realistic fur and feather textures.
• When using transfer paper or graphite pencil for the initial outline, always remove most of it before the colour stage as these lines could show through the layers of coloured pencil.
• Some pencil artists spray their artwork with Workable Fixative after each session to prevent “wax bloom”, but I prefer to do it once – before the final “highlights stage” as I find that Fixative smoothes the textured surface of the paper and prevents me from achieving certain results.
• If you need to correct mistakes and remove heavily laid colour – electric or battery-powered erasers work best as they do not push pigment around and do not create ugly smears. Use an erasing shield for tight places and precise edges.
• Get to know your subject, use additional photos or enlargements for problem areas.