MATERIALS
• Art Spectrum ColourFix paper – Black A mixture of pastel pencils and pastel sticks.
• Sanding paper.
• Kneadable eraser.
• Sharpener.
• Workable fixative.
STEP ONE
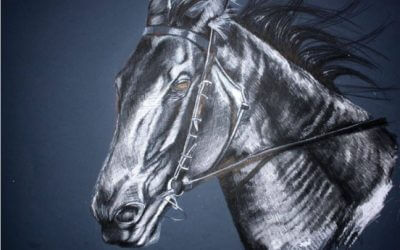
Because I love Art Spectrum ColourFix paper, I chose black as the background colour. In using black I hoped to highlight Woofa’s distinguished hair and beard. For this portrait I transferred the image (rather than hand-drawing it). I feel the importance of getting the features correct can make or break a portrait. I can hand-draw portraits, using a measurement method, but it takes a very long time and basically produces the same result. I like to have images of the subject around me as I draw, hoping to capture the personality.

STEP TWO
I examined the reference photographs and chose my colours. I started with the dark colours in the face (although there were not many); and then commenced to layer the lighter colours to establish a base. This was done roughly, as you can see. I used my fingers to blend.
Make sure you wash and dry your hands regularly during blending. I have at times had up to eight fingers that have had eight different colours on them – and many times I have used the wrong finger to blend on the wrong colour. As I use each colour I put it aside, building a pile of materials so that colours that I am using regularly are easily accessible (and I am not left wondering which colour I have used). I work predominately on the face at first, so as not to smudge any surrounding areas, and I spray lightly with workable fixative between each step to avoid mud’.

STEP THREE
The eyes. Most people are drawn to the eyes in a portrait – so the shape, colour and reflective light are highly important I examined the reference photographs for colour detail. I sharpened my pencils (but not to a point). Using sanding paper, I sanded the pencil tips to a sharp edge.
This allowed me to get a fine edge; and lines in detailed areas, such as the eyes.
At this stage, in this project, I was not altogether convinced the portrait would work. This is a common occurrence in most of my works … but I always soldier on.

STEP FOUR
I used light skin and light orange coloured pencils and heavily blended them with the other colours. I used my fingers to blend as well, and I redrew the glasses lightly with black. I was happy again. I started to draw in the hair and the beard.

STEP FIVE
As I had used too much light skin colour in Step Four, I re-blended in some of the redder colour in the face. I darkened and thickened the glasses and added white to the highlighted areas, including the glasses. I tried to highlight in the direction of the hair or skin.
I also used a bluey colour for the shadowed areas, like those around the nose and sides of the face. My favourite colour for this is the Derwent Pastel Pencil colour of ‘Indigo’. I use it in most of my drawings.
I placed my drawing and reference photographs where I could see them while sitting in the lounge room. I viewed the work from a distance, for a couple of days. My family did the same and offered suggestions of where things might need to change. I noticed that the glasses were out of proportion on the right.

STEP SIX
I worked on the detail. I played with the eyes. I added fine white hairs to the brows and started to build the beard and hair. Using white and a light skin coloured pencil, I again toned down the red. I added a little more of a light orange to some areas as well. I used a grey in the hair and beard.

STEP SEVEN
Trying very hard to bring out the highlights in the hair, I used a finely sharpened white pencil – but I also sparingly used grey, umber and indigo to add colour to the hair. The glasses were adjusted. The subject had fine red capillaries on his cheeks (without them it would not be ‘him’).
Using a kneadable eraser, I blotted the black areas of the paper to remove loose pastel. I do not rub, as that would leave bits of the eraser on the paper.

FINAL STEP
I added the suit and a bow tie. I used white, black and indigo for this. When I had finished, I flicked some white at the bottom of the beard over the clothing to give it a bit of depth.
Not forgetting an important part, I signed and dated the finished work.

ARTIST’S HINTS AND TIPS
• Draw every day if possible;even if only for 15 minutes.
• Do demonstrations found in books, magazines (like this one), and DVDs. It is amazing what you will learn from these.
• Drawing can be a lonely hobby – start a group where you all draw or paint together regularly and enjoy sharing your passion and ideas. Continue to challenge yourself. Don’t assume you cannot do something Just give it a go. If it doesn’t work, find out why and what to do about it. Then have another go until you’re happy with it.
• Take your camera everywhere.Take hundreds of photographs … every now and then, one or two of them will be outstanding.
• Learn to love your work.