

Materials
• Reference photograph.
• Ampersand Claybord.
• Ampersand Black Repair Ink.
• Small round paint brush.
• Cotton gloves.
• White Graphite/Chacopaper.
• Craft knife.
• Spray varnish.
Ampersand Claybord is a Masonite board which is covered with white Kaolin clay and this is then covered with India Ink.
Scratch art is a form of etching which is done by scratching lines and dots with the white areas being achieved by removing the black ink to show the white clay underneath; and for very dark shading, the black is left ‘as is’. There are a number of tools that can be used for scratching. I have used a craft knife that has a number of different blades (which can be purchased from the ‘dollar’ stores).
Animals with fur and hair are ideal subjects for scratch art; although portraits and still lifes can also be done.
Scratch art is very unforgiving if a mistake is made during the progress of your work; however minor mistakes can be corrected by painting over the area with Ampersand Black Repair Ink and then re-scratching.
STEP ONE
Firstly, choose a suitable image for your scratch art. Convert the image to greyscale on a computer, as this will help to show the highlights and shading.
Make a line drawing of the image, showing the fur direction and where the highlights and shading are to be placed. Once the line drawing is completed to your satisfaction, trace the outline onto the board.

STEP TWO
Begin scratching out the image. Initially, I scratch very lightly using short strokes; and then, to lighten the highlights further, I use more pressure. Various pressure is used to achieve the light and dark areas and it is very important to follow the direction of the fur growth. A close-up image will show the short overlapping strokes and the different directions of the fur growth.

STEP THREE
Here, I have continued to scratch the head of the deer – working my way down to the back. A closeup image will show the light patches of fur – this is where more pressure is needed while scratching.

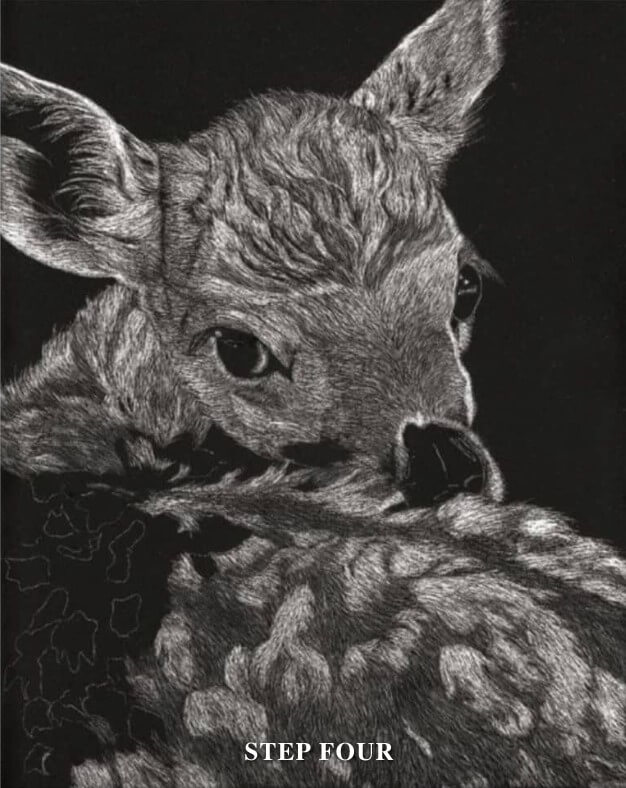
STEP FOUR
Almost done. If I feel that some areas need to be darkened, I re-ink and lightly re-scratch.
FINAL STEP
The work is completed after approximately 30 hours. The finished picture is sprayed with two to three coats of varnish.
A scratchboard picture can be framed with or without glass.

MASTER HINTS AND TIPS
• Make sure your drawing is correct before transferring it to the board.
• Wear the cotton gloves at all times whilst working on your piece – this is to prevent the oil from your skin marking the board.
• Use sharp blades.


