MATERIALS
• Mellotex paper: 610 x 475 mm.
• HB and 2B Staedtler clutch pencils.
• 2B graphite stick.
• Tuff Stuff eraser.
• Paper Mate ‘E’ Racer.
• Plastic eraser.
• Blu-Tack.
• Paper stumps.
• Tissues.
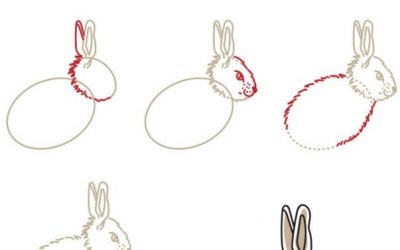
STEP ONE
After lightly sketching the outline, I load a tissue with graphite powder and define the darker and lighter areas of the drawing. This gives me an idea of the differevnt areas and how it has to be shaded.

STEP TWO
Starting at the top left side, I begin to fill in detail. I would normally do the eyes first – but in this particular work, it wasn’t as important. I work my way from top to bottom, left to right, adding extra dark areas with a graphite-laden stump,filling in with thousands of pencil strokes, and erasing ‘hairs’; then I do it all over again until the fur has the right depth’.

STEP THREE
I work my way across the page, again working from top to bottom, repeating the steps above.

STEP FOUR
At this stage I generally go back over what I’ve done, further deepening fur texture if necessary and darkening or lightening where required, while checking shadows and highlights.

STEP FIVE
When I’m almost finished, I go over the whole thing – adding strokes here, erasing there, until I’m satisfied. I then clean up the graphite smudging around the drawing, and voila! Finished!