
MATERIALS
• 2000gsm Rising Museum Board
• Winsor and Newton Artist’s Quality watercolours and gouache: Cobalt, Yellow Ochre, Raw Umber, Raw Sienna, Paynes Grey, Cadmium Red, Cadmium Yellow, Cobalt Blue, Ultramarine, Sap Green, Cadmium Lemon, Van Dyke Brown, Oxide of Chromium
• Aerocolour Liquid Acrylic
• Winsor and Newton Series 7 watercolour brushes – sizes 000, 0, 2
• Tracing film
• Masking fluid
• Airbrush
• Compressor
• Masking film
• Scalpel
• Photo reference
• Computer
STEP ONE
Drawings are complete, cut out, and pasted onto paper. Using a photocopier that enlarges/reduces your drawing will save you a huge amount of time re-drawing!
The bird on the left was drawn from a new reference photo. The bird on the right was traced and “flipped” from the first painting.
Watercolour allows for extremely minimal corrections, so it’s imperative that the composition and size are absolutely correct. I’ve added some additional branches and leaves in the foreground. Again, this was emailed to the client for approval.


STEP TWO
Using tracing film, the birds were traced and transferred to the museum board. Museum board is completely archival, but tends to delaminate easily, so the less rubbing and scuffing on the surface the better.
Once the masking film was applied, the outlines of the leaves, branches and birds were carefully cut out with a scalpel. I want the subjects to stay white, so only the background film was removed.
Using Cobalt and Yellow Ochre liquid acrylic, a pale gradation from the blue to yellow was airbrushed.

STEP THREE
The masking film is left on the board, as I don’t wish for the background paint to run into the foreground subjects.
TIP: Masking film can stay on the board indefinitely, as it’s very low tack. However, if you are using masking fluid, leave it on for no longer than a day or two, as it becomes very sticky and difficult to remove.
Work on the background starts. Most of the background is painted slightly out of focus: a painstaking process of multi-laying the watercolour, while ensuring the tonal values are correct.
Shadows tend to be the complementary opposite of what they are falling on. The grasses are yellowish, (painted primarily with Raw Umber and Raw Sienna), so the shadows have been painted with mainly Paynes Grey, which contains some purple.

STEP FOUR
The background is finished, and now the real fun starts! I have started to peel the masking film from the board, so the left rosella can be painted.
He’s done primarily with a 000 brush, and nothing out of focus here. There are no shortcuts to painting detailed and anatomically correct birds – each feather must be in its correct place, colour and shape.
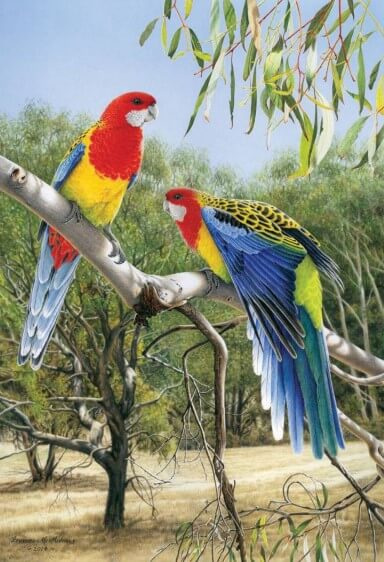
Eastern Rosellas have orangeyred heads, so Cadmium Red is the ideal choice. However, if you just use a wash of Cadmium Red to start, it will look pink! To really make red “sing”, I use a preliminary wash of Cadmium Yellow, then overlay the red.

STEP FIVE
Leaves at the top are complete and the female rosella is on its way. All the masking film has been removed. Blue feathers are painted with varying mixes of Cobalt Blue and Ultramarine.
I think the hardest part is getting the colours of the gum trees correct. They seem to be every colour except green! I’ve used Oxide of Chromium, Sap Green, Cadmium Lemon, Van Dyke Brown and Paynes Grey. Even now, I’m still wondering if I’ve got it right.

FINAL STEP
Finished at last! This took around eight months and 170 hours to complete. “Heatwave” – 35 x 50cm.

ARTIST’S HINTS AND TIPS
• A title should always mean something, and “Heatwave” was titled because the reference photos were taken during one.
• You don’t have to travel extensively to find wonderful reference material. All the reference material was found only within about 100 metres from our house.


