
MATERIALS
• Liqutex Matt Varnish
• Liqutex Gloss Medium Varnish
• Acrylic Primer Interior mediums
• 80z cotton Duck canvas
• Pine wooden stretcher
• Dervan Matisse Acrylic Paint
White – Carbon Black – Raw Sienna – Burnt Umber – Burnt Sienna – Raw Umber – Cobalt Blue Hue – Napthol Scarlet
• Brushes
Princeton Sap Bright 10 – 6 – Royal Crafters Choice 0-1-5/0 – Neef Comb Brushes 14 – 12-1/3 – Liner Brush’s -Neef 20/0-0-00
STEP ONE
Prepare the canvas by applying two coats of primer. Make sure the first coat is thoroughly dry before applying the final coat. Transfer your image to the canvas using graphite paper, making sure the dog is placed within the canvas area. I decided to fill most of the space with the whole image to create impact. Sometimes too much background area detracts from your subject. For this painting I started with the nose, something I normally don’t do but that’s how it goes sometimes. I made up a substantial amount of Grey/ Brown using Black, Raw Umber, Raw Sienna and White for a base colour for the whole painting. For the nose, I laid down the Grey/Brown adding Black to darken, then using small amounts of White, lighted up the nose on the top and sides using a small liner brush and dobbing paint layers dark to light. I then highlighted the left side of the nose with Cobalt Blue Hue and White and then added Raw Sienna dabs of paint to add to the shine. The inside of the nostrils were painted with Black and I then highlight the inner edges with shades of Grey/Brown.

STEP TWO
For this next step I painted the eyes putting down Raw Umber as the base colour, and then layered lightened Raw Sienna round the bottom of the eye. Added the Cobalt Blue Hue and White in the top and put in the pupil using Black with lighter Raw Umber blended back into the Raw Sienna, adding some highlights at the bottom of the eye and a shadow at the top of the eyeball to indicate an eyelid shadow.

STEP THREE
For this next step I basically drew the features with my paintbrush, mapping out where the fur would lay, where the mouth was and then started to paint around the eyes with Black and Dark Grey/Brown to create an eye socket.

STEP FOUR
For the next step I did the under painting using a light layer of Raw Umber, Raw Sienna and Black. I then began to work on the mouth area adding some colour inside to indicate the gums by using a mixture of Napthol Scarlet and Grey Brown with a touch of Black and White. Then I worked on his lip, painting it black and then adding the same blue combination I used on his nose, working dark to light as usual.

STEP FIVE
For this next step I began layering thin lighter colours using Raw Sienna and White, making it possible to see the bottom layers, which will then help to create the foundation colours for the fur.

STEP SIX
This is where I add the darker areas on the face and ears, again mapping out where the fur will go.

STEP SEVEN
This step is when the character of the painting really starts to appear, as I begin adding the fur, using Raw Umber and some black. I then use water to thin down the paint so when I use the Neef comb brushes, it flows a lot better and you get wisps of colour. I also use the comb brush for these bottom layers as it gives the illusion of thickness and I slowly build up the layers of fur, lightening it slightly with each coat of paint, one stroke at a time. During this process I’m constantly checking my reference image, observing the fur’s directions and making sure I’m following the same fur pattern.

STEP EIGHT
This step is about refining the fur as I use various size liner brushes and smaller comb brushes, alternative layers dark to light and then highlighting with a light paint mix to define the fur and add depth.

STEP NINE
This time I painted White areas for the fur on his chin and highlighted the jowls. It was at this stage that I began to paint the longer individual hairs for his whiskers and chin hairs. I then brought the hair over his lips using a liner brush. It was also at this stage that I added wisps of hair using Burnt Sienna to give him his reddish tinged beard.

STEP TEN
For this step I used a larger comb brush to create the chest fur, highlighting with Raw Sienna, Brown/ Grey, Raw Umber, Black and White.

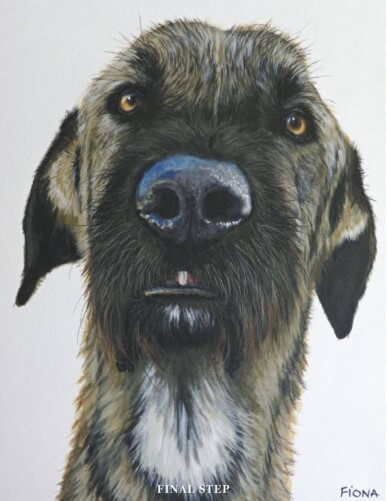
FINAL STEP
As a final step and using a very thin and old liner brush, I add his eyebrow hairs, more whiskers and his more defined hairs around his face, ears and neck. For those, I used a combination of Black and a lighter Brown Grey and touched up his nose with a few more highlights.

ARTIST’S HINTS AND TIPS
• With a commission, especially a pet, observation is the key. You need to make sure you get the colour right and make sure any little quirky features like his weird tooth have been added in the right place. I was working from a photograph I had taken of Ronin, so I made sure that I captured what I photographed- a true depiction of your subject is usually what your client is looking for.
• By mixing browns into your grey you can achieve a different tonal greyscale, you can also get a more steel grey by using blues or if you desire, a more tan grey colour by adding orange.
• I used very little water, mostly dry brush for the layers except when painting in the individual hairs, when you will need a very wet liner brush to get a good flow.
• Make up a decent amount of your base colour so you can keep consistent colour throughout the painting. My base colour was Raw Sienna, Raw Umber and Grey but by using Black or White you can add the varying tints, hues and tones.
• I use a long container with a damp cloth and baking paper as my palette so I can come and go without worrying about paint drying out and wastage. Putting the lid on the paint to ensure it is sealed means it can be used daily without dehydrating. I just give it a spritz with water every now and then, to stop a skin from forming on the paint.
• It’s always good to get feedback from those around you. They can often see things you don’t see, which ultimately benefits you and your painting.


