

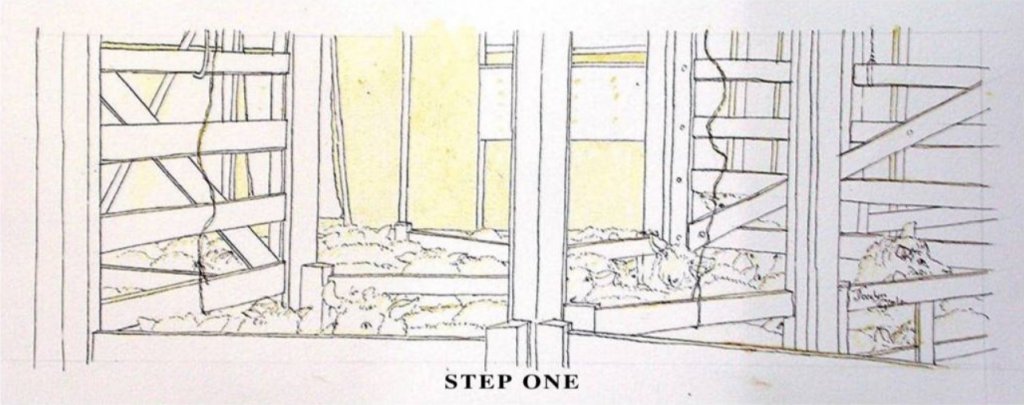
STEP ONE
Pencil up the drawing on paper, making sure that all line work is accurate in terms of perspective and other details such as shape and proportion. It helps to lightly rule straight lines, to give the true location of long edges (such as rafters).
STEP TWO
Pen up the sketch by outlining all the features. Do not shade. Extended straight lines can be slightly ‘off course – this makes the final work softer (not tight or prissy). Don’t panic if you run out of ink part-way through a long line, and re-commence with a thicker stroke.Don’t worry if there are slight gaps or wobbles. Errors can sometimes be camouflaged with later pen work.

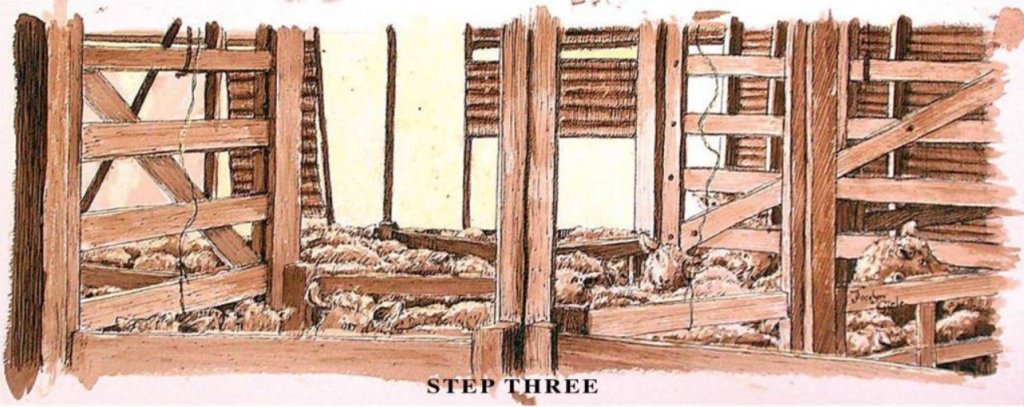
STEP THREE
Wherever no ink at all is required (open doors or windows, chinks in walls or very strong highlights), mask out with liquid latex applied with a fine brush. Allow the latex to dry, then apply ink. Use three dilutions: One drop of ink to five or six brushloads of water; two or three drops of ink to six brushloads of water; and four to six drops of ink to two or three brushloads of water. You can lighten colours by blotting immediately or when the ink has set slightly; or by applying with a wetter brush. When blotting with tissue, you can experiment with finger pressure to soften and lighten areas.
Remember that you can darken areas by using more ink or adding detail, but you cannot lighten areas which are already coloured. Try to have five or six graduations of colour, and a pleasant balance of tone.
Watercolour techniques are used when applying inks with a brush: Wet on wet, wet on dry, and dry on dry. Graduate shadings as dictated by the subject. Create light, depth, shape and tone. Work thoughtfully and touch up where necessary.
STEP FOUR
Re-pen all important lines to sharpen, darken and broaden. Deepen darker areas using hatching lines – parallel, curved, angled; various thicknesses and spacings. Use differing pen nibs if desired. Stand back; squint and evaluate the overall effect. View your work in a mirror and make changes if necessary.
Remove latex by rubbing with your finger. Check your picture again when the strong white areas have been revealed.
Tweak the dark areas and important shapes. Place some foliage outside the windows and doors – use your tissue to soften this.
Frame the picture with a dark brown rustic frame and a narrow neutral matt which has a fine inner border of dark brown.

MASTER HINTS AND TIPS
• To prevent this style of work from becoming clinical or formal, it helps to include people and/or animals, or evidence of their presence (things left lying around or about to be used). Loose brushwork also helps.
• Use plenty of contrast and depth.
• Drawing long straight lines can be hard: Align a ruler close to your line and use it as a guide – but don’t touch the ruler with your pen(it will leave a bad smudge).
• You cannot remove ink once it has dried. Painting white over it, scratching with a knife, or rubbing it, won’t help at all. Swab the offending blot, smudge, error or pen line immediately with lots of water, and blot with clean tissue. Repeated rubbing with clean brush bristles, and more blotting, may leave you with a much lighter mark (one that you can work with).
• You can always go darker with brush and pen work; but not lighter.
• Looking into the light gives lovely dark areas, plus excellent highlights.
• Detail in pen work is often what makes an important difference.
• Burnt Umber is a great colour … but regularly shake your bottle. Otherwise the ink will settle out and you won’t be using its full spectrum.
MATERIALS
• Art Spectrum Acrylic Ink:Burnt Umber 223.
• Mapping pen or similar dip-in pen.
• Kleenex tissues for blotting work.
• Arches Cold Pressed Watercolour Paper – 300gsm or 640gsm.
• Papermate Pacer Pencil – 0.5mm lead.
• Kneadable Eraser and ruler
• Liquid Latex (Art Spectrum Masking Fluid).
• Palette with at least three sections.
• Brushes: Number 10; Number 2; Taklon; Round Brush.


