
MATERIALS
• Prepared canvas.
• Art board and acrylic glue.
• Flat acrylic undercoat.
• Artists’ quality oil paints (Winsor & Newton, Art Spectrum): Titanium White; Naples Yellow; Cadmium Yellow Pale; Cadmium Yellow; Yellow Ochre; Raw Sienna; Burnt Sienna; Burnt Umber; Indian Red; Cadmium Red; Alizarin Crimson; Ultra Blue; Cobalt Blue; Cerulean Blue.
• Hog hair and Sable brushes.
• AS medium (Numbers 2 and 4).
• Turps.
STEP ONE
I like to mount my own canvas. I cut a piece of board to a selected size and then cut prepared canvas about a centimetre larger than the board all around. I cover the board with acrylic glue, making an even layer. I lay the canvas, unprepared side down on the glued board with an even amount of overlap. With my hands, or a roller, I press the canvas firmly onto the board – paying special attention to the edges. The glue dries quickly so I have to work fast. When the glue is quite dry, I trim the excess canvas off to make a neat edge. A coat or two of flat acrylic white (toned down to a more neutral colour with a bit of Yellow Ochre) takes the glaring whiteness off the canvas. I lightly sandpaper the surface to take off excessive roughness.
STEP TWO
Having selected a subject that excites me, I make a pencil drawing to establish the composition.

STEP THREE
I trace the main features of the drawing onto the canvas and go over it with Burnt Umber acrylic, using a fine Sable brush.

STEP FOUR
Using quality artists’ paints, I start by working up from the horizon with my colours muted – using Titanium White, Naples Yellow and perhaps a little Crimson. I add more colour pigment as I move up the sky – mostly Cerulean Blue with a bit of Cobalt towards the top. For the grey of the clouds, I use Cobalt or Ultra Blue, with Earth Red, Umber or Sienna. I try to work spontaneously to get the canvas covered – getting the colour as true as I can so that it doesn’t have to be painted over afterwards.
Rubens is believed to have said: “You have so much to do, so try to do it right the first time.”
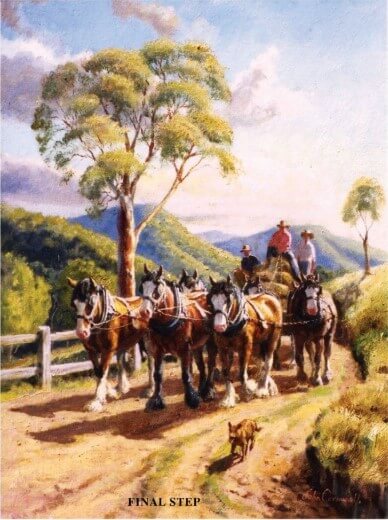
I paint the distant hills, making the colour and texture more intense as the forms get closer to the foreground. I make the diagonals of the hills pretty strong to balance the strong diagonal of the figures, wagon and horse team. Cobalt Blue, Raw Sienna, Yellow Ochre, Earth Red and Cadmium Yellow are used in the hills. I don’t use any prepared greens but prefer to mix them from the colours mentioned – this helps to retain a unity in the whole work.

STEP FIVE
Leaving the horses like ghosts in the landscape, I put the road in the foreground – painting over the outline to avoid those annoying little bits of unfilled edges. I don’t worry about overpainting the drawing a bit, as I can pick it up again where it grins through the paint. I save my strongest colours, tones and textures for the foreground.
STEP SIX
Beginning on the horses with the lowest tones of manes, collars, legs and shadows, I work up to the highest tones (which I leave until last), always keeping the anatomy of the animals in mind.
I paint the tree, which makes a strong balancing vertical on the left. I stipple in the lowest tones of the foliage with an old long-hair brush with splayed bristles, working up to the highest tones. The smallest twigs and branches are put in with a lining brush. The trunk with its peeling bark makes a strong feature to keep the eye rotating around the whole composition. A small Sable brush is useful to paint the final details and highlights. Sometimes I use the edge of a palette knife for clean, sharp edges. To express form, I work from cool in shadow to warm in light.


MASTER HINTS AND TIPS
• II use a Perspex palette upon which I lay out my colours (always in the same order); and I mix them on disposable palettes. This means I do not have to set up again when I restart work after a few hours, as the paints are not too dry to use. Sometimes they even remain useable overnight.
• I often tone down strong colours with Naples Yellow, rather than White which can make them too cold.
• It is best to keep a work for a while before letting it go, because you will always find something which needs to be done. However, be careful not to remove the vigour from a canvas by overworking it.


