

MATERIALS
• Saunders Rough 300gsm paper.
• 2B pencil.
• Winsor & Newton watercolours: French Ultramarine; Cobalt Blue; Cobalt Turquoise; Brown Madder; Light Red; Raw Umber; Raw Sienna; Aureolion;
Quinacradone Gold; Permanent Rose.
• Brushes: Number 12 Raphael Sable and a Number 8 Escoda synthetic.
STEP ONE
I sketched a simple drawing to identify the main shapes.

STEP TWO
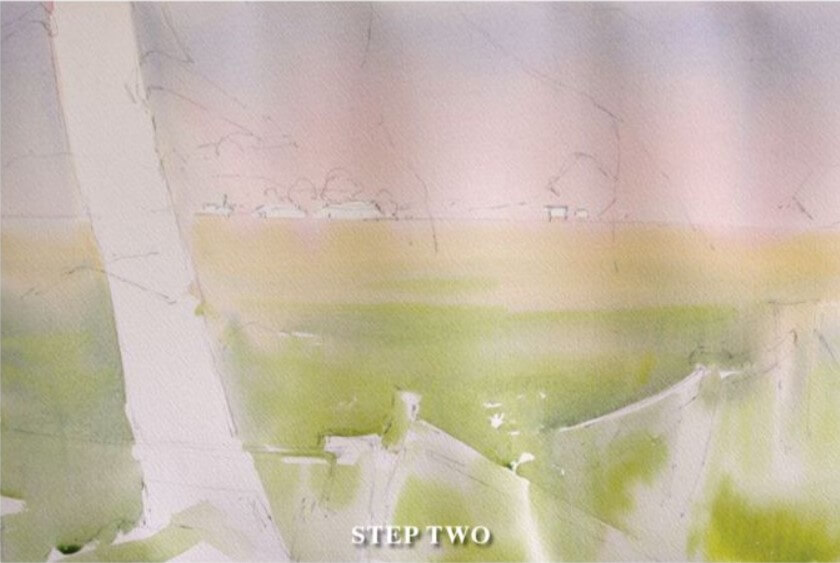
My first wash was from the top down, wet-inwet. I painted with my board on a 30 degree angle. I wet the sky area, then added a soft wash of Raw Sienna followed by Permanent Rose then Cobalt Blue. I allowed gravity to do the work, allowing the flow to the horizon line; then went straight into the foreground with Raw Sienna – adding more pigment as I came down the page and adding Raw Umber mixed with Cobalt Turquoise and a little Aureolion (being careful to leave some whites for sparkle).
STEP THREE
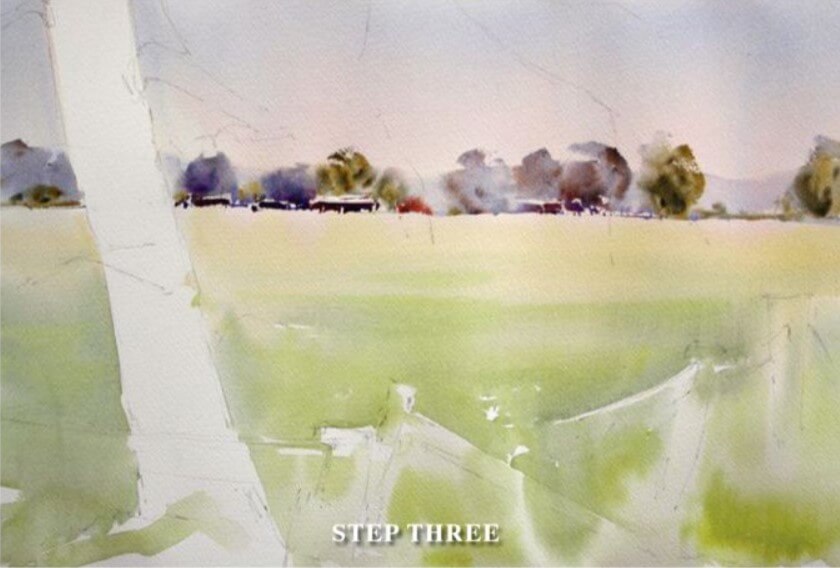
When the first wash was completely dry, I re-wet the tree line and added the distant trees with a mix of Cobalt Blue and Light Red, again keeping my whites. I strengthened the pigment for the shadow areas of the trees. As the wash started to tighten, I used a stronger mix of Cobalt and Light Red for the mid trees. The closer trees were Raw Umber and French Ultramarine applied when the underpainting was still damp, to soften the edges. The sheds were underpainted in Quinacradone Gold and Permanent Rose; then while still wet French Ultramarine and Brown Madder were dropped in.
STEP FOUR
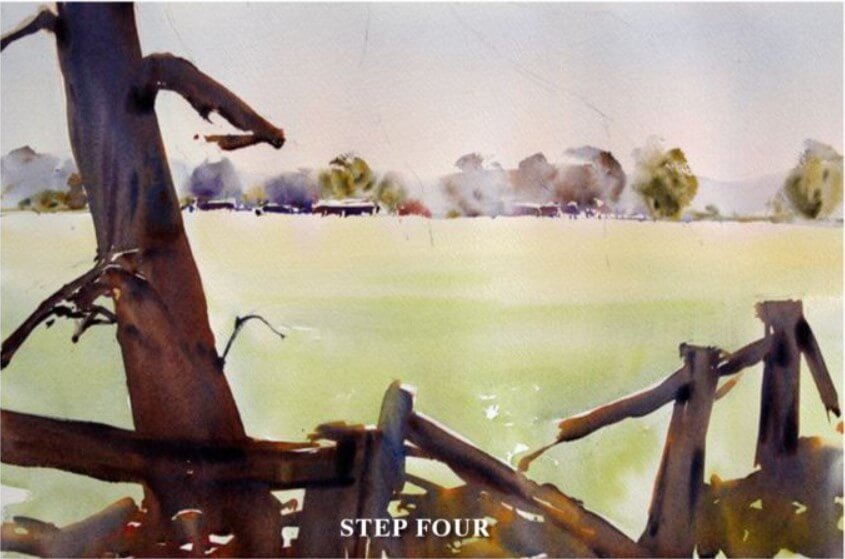
I started the foreground tree and fences by underpainting with a strong mix of Permanent Rose and Quinacradone Gold, joining all the shapes together. While still wet, I overpainted with French Ultramarine and Brown Madder, varying the pigment quantities for interest. While still damp, I added the darks to suggest the fences being separate from the tree. I started to indicate some branches. It was important to still maintain the whites.
STEP FIVE
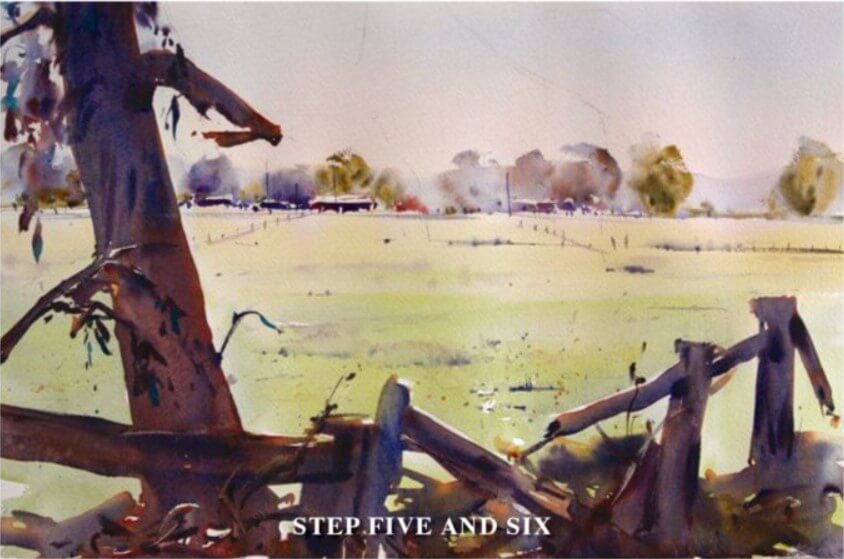
It was time to add a few verticles, poles, fences and the like. I re-wet the paddock and added some soft grass shadows to give a little depth. It was crucial not to overdo the detail here.
STEP SIX
I started the foliage by randomly wetting the paper and indicating shapes using Brown Madder and French Ultramarine. I also started to bring out some of the branches at the base, but just a suggestion. I used some strong, sharp edges for variation and added some pure Cobalt Turquoise leaves.
FINAL STEP
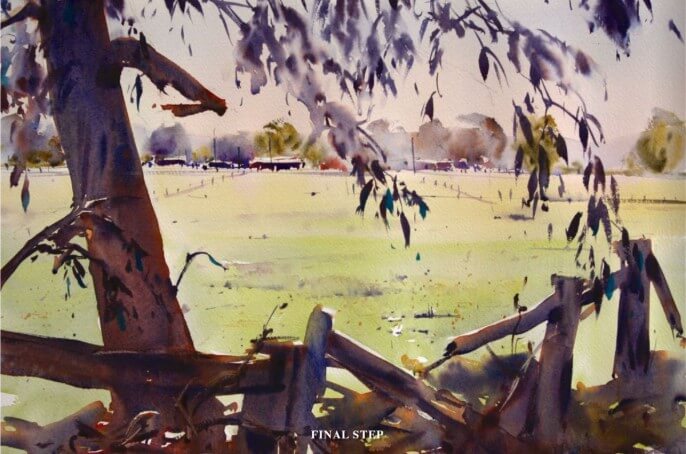
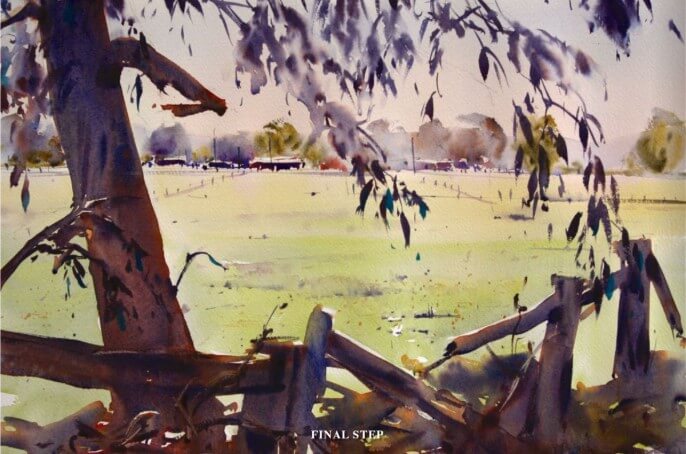
To complete the painting ‘Early Morning, Tumut’, I again randomly splashed water and dropped in my leaves and allowed them to soften. I added a few hard edges to give some depth.
I wanted to paint this picture because of the way the tree, fences and foliage framed the farm. Once I started to paint I rarely looked at the photograph … because I was trying to remember the atmosphere more than the actual scene.
ARTIST’S HINTS AND TIPS
• Always set up your paints on the left, if left-handed, and the right, if right-handed. I have seen many beginners going across their paintings to reach paints and water.
• Have everything ready at hand before you begin.
• Squint, squint, squint to eliminate detail and get to the basic shapes and tones.
• Do simple pictures in one pigment to help with tonal values.
• Go to galleries and exhibitions and look at lots of pictures.
• Learn from your mistakes. Remember, it is only a piece of paper; turn it over and start again.
• Do swatches of different pigments in varying densities to see what happens. A good reference for this exercise is Richard Schmids’ Alla Prima’.
• Always have your colours in the same position on your palette,and use the best quality artists’ paints for the best possible result.
• Keep your palette simple. My main colours are: French Ultarmarine Blue, Cobalt Blue, Brown Madder, Light Red, Raw Sienna, and Permanent Rose. I supplement these with Cobalt Turquiose, Raw Umber, Quinacradone Gold, Aureolion and Alizarin Crimson. I also have Cadmium Red, Orange and Yellow for strong colour accents – especially in streetscapes.


